Degreasing for a Perfect Bond: Solvents and Methods That Remove Contaminants
What are the best degreasers for cleaning surfaces before gluing?
On this page
You’ve sanded, you’ve clamped, and it still fell apart. The invisible grease from your fingertips or manufacturing oils likely sabotaged the bond. But not all degreasers are equal — use the wrong one and you could melt your plastic or leave behind a residue worse than the grease. Here’s exactly which solvent to reach for, based on what you’re bonding.
Why Invisible Contaminants Sabotage Your Bond
The best degreaser for pre-bond cleaning depends on the contaminant and the material you’re bonding, but one thing’s certain: a quick dry wipe won’t cut it. Most adhesive failures trace back to invisible films—oils from fingerprints, mold release agents on new plastics, or even silicone residues—that create a weak boundary layer between adhesive and surface. Chemical degreasing with solvents like isopropyl alcohol or acetone removes these hidden saboteurs, giving your bond a fighting chance. In aerospace bonding, NASA specifies precleaning metals with MEK or isopropanol before adhesive ever touches the surface (NASA).
Test Before You Stress: The Water Bead Cleanliness Check
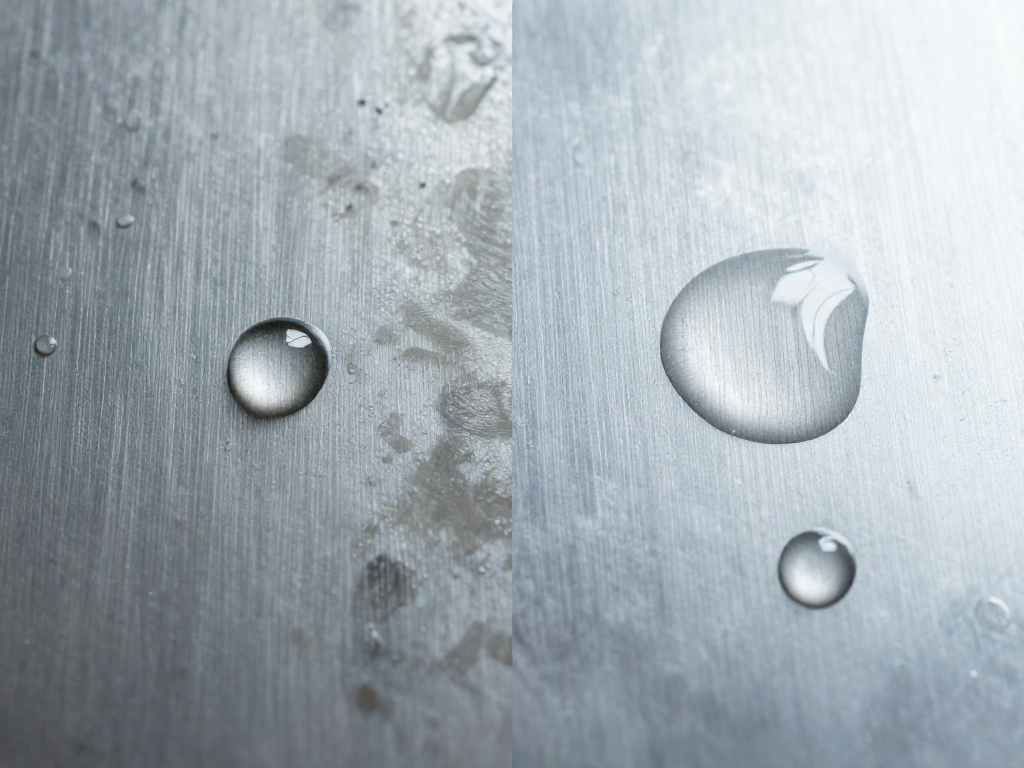
A single droplet of water tells you more about surface readiness than your eyes ever will. When you wipe down a part and it looks spotless, invisible residues can still wreck adhesion—and the water bead test reveals them instantly.
Grab some deionized or distilled water (tap water can leave mineral traces). Place a small drop on the cleaned surface and watch. If the water pulls into a tight bead, contaminants are still present—oil, silicone, or leftover cleaner residue are repelling it. That bond would fail. If the water instead spreads into a thin, even film, the surface is clean enough for adhesive. According to 3M’s Learning Lab, this simple check gives a reliable go/no-go signal when you’re prepping for a structural bond.
Perform the test after every cleaning pass, and repeat until that drop flattens out. If you’ve used acetone, be especially suspicious: it can dissolve heavy grime but sometimes leaves its own film. A follow-up wipe with isopropyl alcohol and another water check clears that up.
Solvent Showdown: Match Your Degreaser to the Surface
You can’t grab the same can of solvent for every surface and expect a reliable bond. The right degreaser lifts contamination without attacking the material underneath—and the wrong one leaves the part weaker than before you started. Here’s how to match your cleaner to the job.
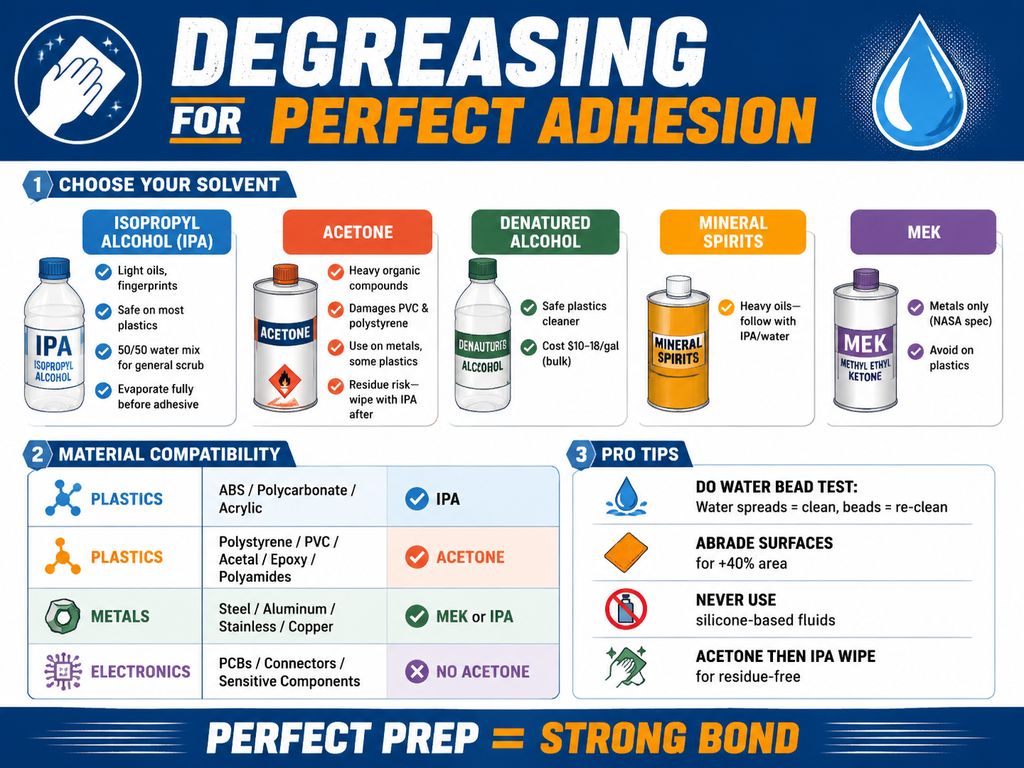
For fingerprints, light oil, and everyday shop grime, isopropyl alcohol (IPA) is the first thing to reach for. A 50:50 blend of IPA and water scrubs away dust and dissolves light grease without any risk to sensitive plastics. Plastics like ABS, polycarbonate, and acrylic specifically call for an IPA degrease in 3M’s guidelines—skip the acetone on these or you’ll see hazing or cracks. IPA evaporates quickly and leaves almost nothing behind, so it’s ideal for most household repairs and light-duty assemblies.
If you want a solvent that’s even friendlier to delicate materials, denatured alcohol steps up. It won’t damage plastics, it’s safe for painted parts, and it costs less than acetone. For cleaning circuit boards, painted brackets, or any plastic you’re not 100% sure about, denatured alcohol cleans effectively without the danger of softening or etching the surface. On electronics, acetone is a nightmare—it can attack plastic housings and leave conductive residues—so denatured alcohol is the clear pick there.
When the contamination graduates to heavy machine oil, mold release waxes, or caked-on organic residue, it’s time for acetone. Acetone’s aggression cuts where IPA can’t, and it’s surprisingly compatible with a long list of materials. 3M’s pretreatment guide says you can safely acetone-degrease rigid PVC, acetal, epoxy, polyamides, polyester, and polyurethanes. Even NASA’s bonding spec lists acetone as acceptable for thermoplastics and thermosets—just keep it away from polystyrene and any flexible PVC, because those will swell or dissolve. A quick test on a scrap edge is always worth the minute it takes.
Use acetone with a double-wipe strategy: scrub with the acetone, then immediately follow with a clean rag dampened with IPA. That second wipe removes the faint film acetone sometimes leaves behind—a film that can block adhesive just as effectively as the original grease. Let the surface dry until no solvent odor remains.
When you’re facing industrial grime—thick lubricating oils, waxy protective coatings, or old adhesive residues—plain acetone might not cut it. Mineral spirits, naphtha, or dedicated blends like 3M Prep Solvent 70 break down these stubborn contaminants. Just remember they’re not a one-step fix: after the heavy solvent does its job, you must go back with the IPA-water mix to lift away the oily residue. Any leftover solvent film will compromise the bond just like the dirt you were trying to remove.
For electronics, steer completely clear of acetone and stick with denatured alcohol—anything else risks dissolving delicate adhesives or marring connectors. And if you suspect a part was machined with a silicone-based cutting fluid, treat it as a red flag. Silicone is practically invisible and blocks adhesion on a molecular level; no adhesive will grab reliably. In that case, you need mechanical scrubbing followed by repeated solvent passes with IPA to have a fighting chance.
Finally, patience. All these solvents need time to fully evaporate before you apply adhesive. Even a seemingly dry part can hold a micro-layer that interferes with the chemical cure. Wait until the surface is completely dry to the touch and the solvent smell is gone—then you’re ready to bond.
The Right Way to Apply and Evaporate Solvents
Applying the solvent correctly is just as important as picking the right one. Never pour degreaser directly onto the bonding surface—that can spread contaminants around and re-deposit them. Instead, soak a clean, lint-free cloth with your chosen solvent and wipe in a single direction. This lifts oils and dirt off the surface rather than smearing them across it.
For everyday dirt and light grease, a 50:50 mixture of isopropyl alcohol (IPA) and water handles most situations. The alcohol dissolves oily fingerprints while the water picks up loose dust. Scrub thoroughly, then switch to a dry cloth if needed. When you’re up against heavier oils—think machining fluids or thick greases—start with a stronger solvent like naphtha or mineral spirits, then follow up with the IPA/water mix to strip away any remaining film.
Evaporation is non-negotiable. Let the surface dry completely before you even uncap the adhesive. Residual IPA can degrade light-curable materials over time, and acetone is particularly sneaky: it evaporates fast but can leave a faint residue that ruins bond strength. Always chase acetone with a final IPA wipe to remove possible contaminants from the acetone (Dymax).
Before you glue, run a quick water bead test. Place a drop of deionized water on the cleaned area. If it spreads out flat, you’re good to go. If it beads up, there’s still contamination lurking—wipe and test again.
Dos and Don’ts: Avoid These Degreasing Pitfalls
Acetone is a workhorse, but it’s not universal. It can craze polycarbonate, flexible PVC, and other solvent-sensitive plastics—when in doubt, test a hidden corner first. And here’s the step most people skip: according to adhesive manufacturer Dymax, even fast-evaporating solvents like acetone leave a microscopic residue that sabotages adhesion. Follow every acetone pass with a wipe of isopropyl alcohol, then let it dry completely.
Other habits that quietly ruin a bond: letting solvent puddle and soak into porous surfaces, using a shop rag that’s been through fabric softener, or grabbing a paper towel that sheds lint. Silicone-based cleaners are out—they’re persistent bond killers. Once you think you’re clean, do the water bead test. If the droplet beads up, degrease again. And for the love of adhesion, don’t touch the surface with bare hands afterward. Those fingerprints are a fresh layer of skin oils you just worked so hard to remove.
Sources
- Denatured Alcohol vs Acetone: Chemical Composition & Cleaning — elchemy.com
- Is Surface Preparation Needed When Applying Light-Curable Materials? - Dymax — dymax.com
- Surface Preparation to Ensure a Successful Bond - ZONE Enterprises USA National Tape — zoneenterprisesusa.com
- [PDF] Process Specification for Adhesive Bonding - NASA — nasa.gov
- Learning Lab: How to Degrease Materials Before Adhesive ... — youtube.com
- Surface Preparation and Pretreatment for Structural Adhesives — multimedia.3m.com
See also
- Choosing the Best Adhesive for Plastic-to-Metal Bonds
- Abrasion and Surface Roughening for Stronger Adhesion
- How to Bond Delicate Electronics Without Damage
Related articles
Common Surface Prep Mistakes That Ruin Adhesion: Troubleshooting Guide
Why did my glue not stick even though I did everything right?
Jul 22, 2026 · 8 min read
Clamping and Curing: Proper Pressure and Time for Different Adhesives
How much clamping pressure and time do I need for my glue to cure properly?
Jul 22, 2026 · 5 min read
Joint Design for Strong Bonds: Butt, Lap, Scarf, and More
How does the shape of the joint affect glue strength?
Jul 22, 2026 · 12 min read