Joint Design for Strong Bonds: Butt, Lap, Scarf, and More
How does the shape of the joint affect glue strength?
On this page
Start by addressing the common belief that the glue itself is the only factor in bond strength. Reveal that joint design often determines whether a bond holds or fails, because adhesives are strongest in shear and weakest in peel and cleavage. Cite the striking statistic that over 98% of adhesive problems are not due to the adhesive itself, but to other causes like joint design and surface prep.
Why Joint Shape Can Make or Break Your Bond
Most adhesive failures aren't glue problems—they're design problems. A simple butt joint yanks directly on the bond in peel or cleavage, but shaping the joint into a lap forces the stress into shear, the direction adhesives naturally excel at. Even a subtle change like a joggle lap joint keeps the load in-plane and dramatically improves durability (3M). In the next sections, you'll learn exactly how to choose and shape joints so your adhesive works with the forces, not against them.
The Four Faces of Stress: Tension, Shear, Cleavage, and Peel
When a glued joint fails, it's rarely the glue's fault. In fact, more than 98% of adhesive failures trace back to something other than the adhesive itself (Assembly Magazine). Often, it's the way stress flows through the joint. Understanding the four basic types of stress—tension, shear, cleavage, and peel—is the key to designing bonds that hold.
Tension tries to pull the two parts straight apart, like yanking a hat off your head. Adhesives can resist tension, but they do best when the bond line is thin and the force is evenly spread. Shear, on the other hand, slides the bonded surfaces parallel to each other, like scissor blades. This is where adhesives really shine: a properly sized lap joint in shear can support enormous loads because the force is distributed across the entire glued area.
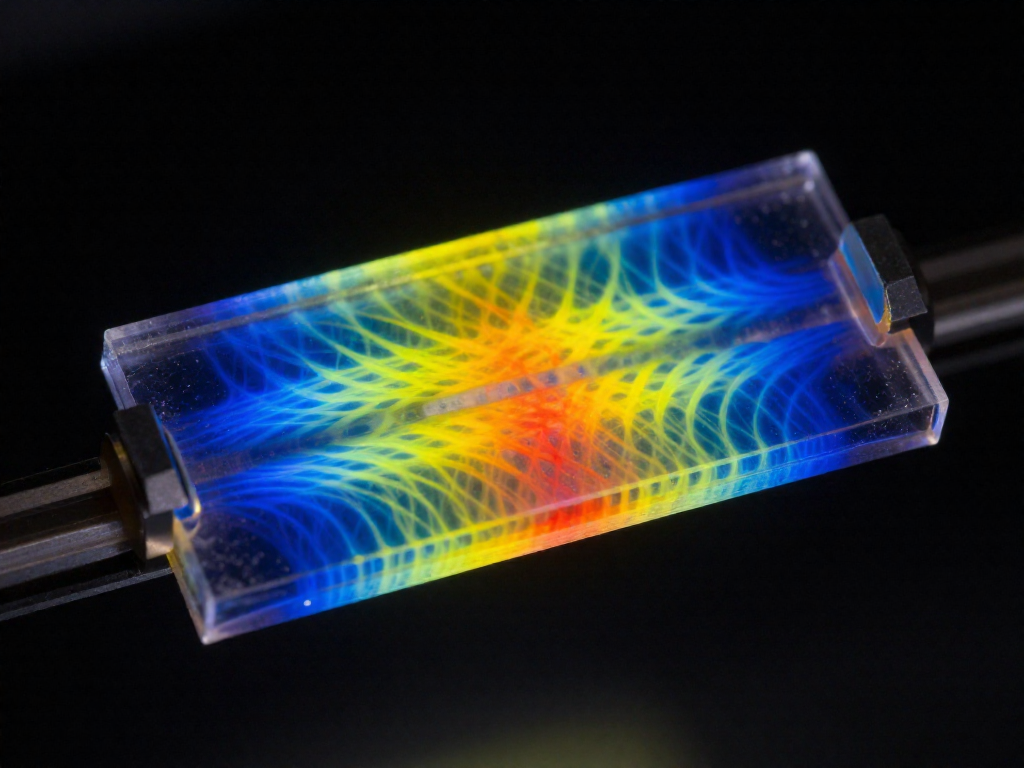
Cleavage is sneaky. It pries one edge of the joint open while the other edge remains stuck, concentrating stress on a tiny line. Even a simple lap joint, which is nominally in shear, can develop cleavage at its leading edges as the parts flex slightly out of alignment. That concentrated stress is why lap joints often start failing at the ends—the middle of the overlap barely contributes. Peel is worse still: a flexible tab being torn off at an angle delivers a vicious, focused force that most adhesives can't withstand.
The golden rule of joint design? Keep the adhesive in compression or shear. Whenever possible, avoid designs that let peeling or prying forces get a foothold.
Butt Joints: Simple but Stress-Prone
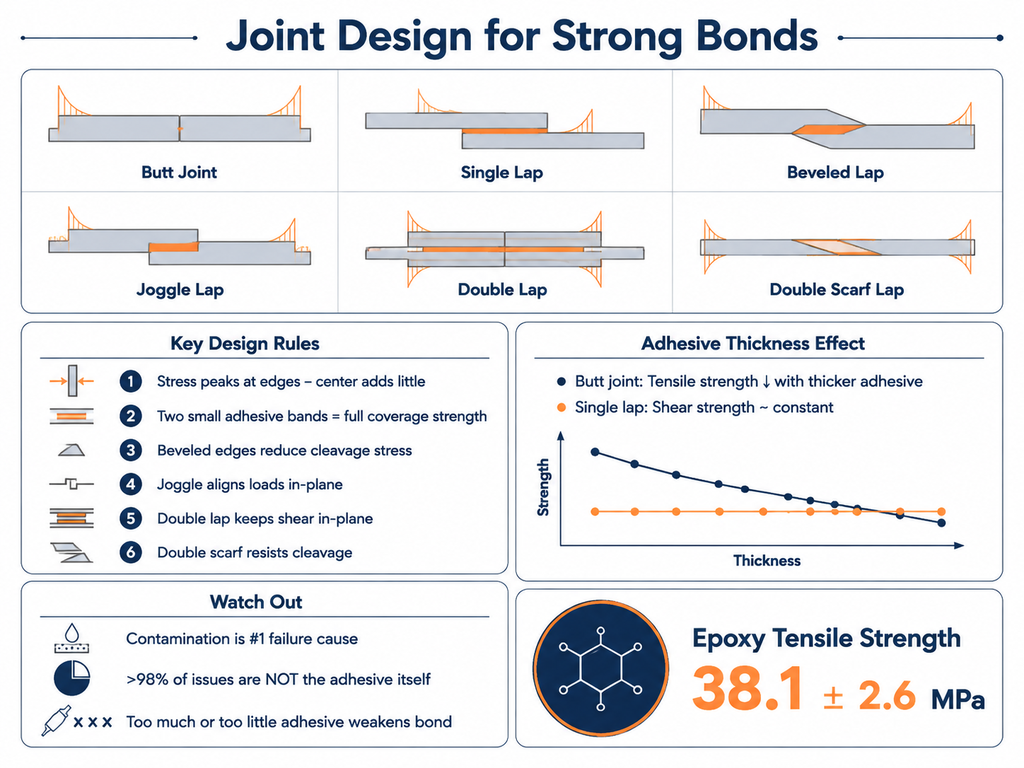
Butt joints are the most intuitive way to join two pieces—square edges butted together, bonded with an adhesive film. They look clean, but that neat 90° corner is actually a stress trap. When the joint is loaded in tension or bending, the adhesive layer at the sharp interface experiences a severe peak in tensile stress right where the bond ends. A comprehensive survey from the Defense Technical Information Center confirms that a 90° air-adhesive interface generates the highest possible stress concentration; lower angles like those in scarf joints dramatically spread the load (DTIC).
Thick adhesive layers make things worse. Unlike lap joints, where shear strength is fairly stable regardless of bondline thickness, butt joint tensile strength drops noticeably as the glue line gets thicker. There’s more material to deform and pull apart under tension, so you want the thinnest, most uniform layer you can manage. Overly thick bonds also shift the failure mode: with small fillet radii at the edge, a butt joint tends to fail within the adhesive itself (cohesive failure), but a larger radius—which you might think would help by smoothing the corner—often shifts the failure to the interface between adhesive and substrate, which is usually weaker.
So when does a butt joint actually make sense? Only when the load is purely in tension, with no bending or peeling component, and you can produce a consistently thin bond line. In that narrow case, the joint can work. But the moment you have any off-axis force, vibration, or flex, the stress concentration will tear it apart. For most repairs, even a simple single lap joint will far outperform a butt joint by moving the adhesive into shear. If you’re stuck with a butt geometry because the parts can’t be lapped, at least bevel them into a scarf to reduce that sharp 90° edge—even a slight angle spreads the load significantly.
Single Lap Joints: The Workhorse with a Hidden Flaw
The single lap joint is everywhere—overlapping metal sheets, plastic patches, or wood repairs—because it seems like a no-brainer: more bonded area equals more strength. But that reasoning misses a hidden flaw. Almost all the load concentrates at the very ends of the overlap, while the center contributes next to nothing. You’re essentially wasting glue in the middle.
Why does this happen? The joint is designed for shear, but the force is applied slightly off-axis. As the joint stretches, that offset causes the adhesive at the leading edges to experience cleavage—a peeling-like stress that’s far more damaging than pure shear. In fact, a nonlinear analysis of titanium single lap joints, taking the adhesive’s ductility into account, predicted a failure load just 10% lower than actual test results (U.S. DOT). The stress concentration is so extreme that most of the bondline is along for the ride, not carrying its share.
This explains a counterintuitive finding: shear strength in a single lap joint stays almost constant regardless of adhesive thickness, but multiple parametric studies show that maximum strength actually increases as you reduce the bondline. Thinner glue lines, down to a few thousandths of an inch, minimize the bending moment that turns shear into cleavage. For epoxy or cyanoacrylate, aim for a tight, uniform bondline—clamp firmly but don’t starve the joint.
Here’s the wild part: you can often get the same ultimate strength using only two narrow bands of adhesive, one at each end of the overlap, instead of the entire area. The center does so little that leaving it unbonded has almost no effect. For brittle adhesives like epoxy, this “two-band” trick works brilliantly—you use less glue and avoid encapsulating stress-raisers. If you need full-area coverage for environmental sealing, that’s different, but for pure load transfer, don’t bother with a continuous puddle.
To get more out of a single lap, you can bevel the ends of the adherends. Tapering the overlap edges reduces the cleavage peak, letting the joint conform better under load. Even a shallow taper can significantly raise the failure load. For critical repairs, consider a joggle (a small step in one substrate) or a double lap, which keep the adhesive in-plane and stress it in true shear. But the single lap, warts and all, remains the most practical joint for quick fixes. Just remember: bond the edges well, keep it thin, and don’t obsess over the middle.
Evolving the Lap: Bevels, Joggles, and Double Laps
A plain single lap joint suffers because the load path kinks slightly out of plane, creating a bending moment that concentrates stress at the ends of the overlap. The center of the bond line contributes next to nothing. You can immediately improve this by tapering the adherend ends into a bevel. The beveled lap lets the material flex and conform during loading, which slashes the cleavage stress trying to pry the edges apart. The key is a shallow angle—the shallower the taper, the lower the stress concentration at the adhesive line. A gentle 15-degree bevel dramatically outperforms a blunt 90-degree butt, even if you don't go all the way to a knife edge.
If beveling feels like too much machining, the joggle lap is often the sweet spot. Here you offset a section of one substrate so the bond sits directly in the load axis. This simple jog realigns the forces into pure shear, killing the out-of-plane bending before it starts. It's the easiest method of bringing loads into alignment (SpecialChem), and it works beautifully with rigid materials like aluminum or thick plastic panels where you can mill or heat-form a step.
For the highest strength and complete bending elimination, step up to a double lap. Both substrates are lapped over each other symmetrically—a center piece sandwiched between two outer strips, or two halves interlocking. The bond line stays perfectly in shear with zero tendency to peel. The trade-off is complexity: the three-dimensional geometry means you'll almost certainly need a liquid adhesive (epoxy, methyl methacrylate) that can flow into the gaps. Film adhesives or tapes are out. But when you can manage it, a double lap converts the flawed lap joint into one of the most efficient structural connections you can make.
Scarf Joints: Gradual Angles for Maximum Strength
When a butt joint fails because stress concentrates at a sharp 90° edge, and a lap joint still bends and peels, the scarf joint steps in as the ultimate refinement. Instead of an abrupt step, you cut the end of each piece at a long, shallow angle so they overlap in a smooth, tapered splice. Everything that makes lap joints vulnerable—offset loads, bending moments, peel at the edges—gets tamed because the glue line is no longer perpendicular to the pull. The load glides through the joint almost as if it were one continuous piece.
This isn’t just intuition; it’s baked into the mechanics of the air-adhesive interface. In a straight interface, the maximum stress kicks up hardest when the interface meets the load at 90°—precisely what a butt joint does. As that angle shallows out, stress drops dramatically. As Mylonas’ survey of adhesive joint mechanics noted, for a straight interface, “the maximum stress concentration in the adhesive was greatest for a 90° angle of inclination… and the stress concentration decreased as the angle decreased” (Defense Technical Information Center). In practice, that means a scarf cut at a 1:10 or 1:20 taper (about 6° to 3°) can push the peak stress so low that you start approaching the strength of the base material itself—something no other common joint design can touch.
Getting that performance, however, demands more than a pretty cut. Scarf joints are unusually sensitive to adhesive thickness. Research consistently shows that joint strength falls as both the scarf angle and the bondline get thicker. A fat glue line puts the adhesive in tension rather than shear and reintroduces the stress risers you tried to eliminate. The target is a bondline under 0.1 mm—essentially a tight, clamped fit with just enough adhesive to fill the microscopic valleys. For the DIY builder, this means using a rigid fixture, applying even pressure, and wiping away excess before it cures.
Choosing the right taper matters. A 1:10 ratio is a practical sweet spot for many repairs: on a 1/4-inch-thick part, that’s a scarf about 2.5 inches long. For truly critical patches—say, a cracked composite bicycle frame or a split wooden paddle shaft—stretching it to 1:20 buys you noticeable extra strength, though it takes patience to cut cleanly. A sharp block plane on wood, a long sanding block on composites, or careful routing will get you there.
Save the scarf for the jobs that truly need it. Splice a structural beam, repair a fiberglass boat hull, fix a load-bearing wood joint where a simple lap would hinge and snap. The double scarf lap joint, which adds a second lapped layer, raises peel resistance even further. Just remember that the fanciest geometry cannot salvage the wrong adhesive; always match the adhesive to the materials and the real load before banking on the joint.
The Two-Band Surprise: Why Less Adhesive Can Be Just as Strong
The lap joint you read about earlier hides a nonobvious efficiency secret: almost all the shear stress concentrates at the very ends of the overlap. The middle of the joint barely works at all. Because the adhesive in that central zone sits nearly stress-free, spreading it across the full overlap adds weight and cost but no meaningful strength. In fact, two narrow bands of adhesive at the beginning and end of the lap can carry the entire load just as well as a fully coated joint. SpecialChem reports that depending on geometry and material properties, those two end-bands routinely match the strength of continuous coverage.
The takeaway for your own repairs is straightforward: when you’re bonding a pure shear lap—two flat strips of metal or rigid plastic, pulled straight along their length—don’t waste glue. Apply a clean, consistent bead across each end of the overlap zone, leaving the middle dry. You’ll save adhesive, shave weight, and still hit full joint capacity.
But this trick comes with a strict “shear-only” rule. Any off-axis load that introduces peel or cleavage immediately pulls on the adhesive in the center, so a two-band joint would fail early. It also isn’t suitable for joints that face vibration, thermal cycling, or moisture ingress, because those rely on a continuous seal to keep the bond line intact over time. For a well-aligned, load-controlled lap, though, the two-band surprise is a powerful, material-saving design move.
Beyond Shape: The Invisible Killers of Bond Strength
Even the most cleverly designed joint will fail if the bonding surfaces aren’t ready. More than 98% of adhesive problems aren’t actually adhesive problems at all — they're prep problems (Assembly Magazine). Contamination from grease, oil, or dust destroys adhesion faster than any design flaw could.
Bond-line thickness is another quiet saboteur. Too much adhesive creates a thick, weak layer; too little starves the joint. Most adhesives perform best in a specific, often surprisingly thin range — and that thickness can shift based on the materials and stress types at play. Add in the effect of surface roughness and chemical treatments (like primers or etching), and you have a set of variables that overshadow joint geometry every time.
A perfectly executed lap or scarf joint still crumbles if the surfaces are dirty or the bond line is sloppy. Shape matters, but surface prep and application precision are what actually keep the bond alive.
Sources
- Mechanics of Adhesive Bonded Lap-Type Joints: Survey and Review — apps.dtic.mil
- Finite Element Analysis of Simple Butt Type Adhesive Joint ... — ripublication.com
- Methods of Analysis and Failure Predictions for Adhesively ... — govinfo.gov
- Adhesive Joint Designs and Strength - Types of Stress & Variables — specialchem.com
- Remove Stress from Adhesive Joints for a Stronger Bond | 3M — 3m.com
- The strength comparison between butt joint and lap joint for — researchgate.net
- Comparison Study of Mechanical Properties on Butt Weld and Lap ... — ijaem.net
- Should You Use a Lap Joint or a Butt Joint When Welding? | Kevin Caron — kevincaron.com
- Welding Joint Types: Butt, Lap, Tee, Edge Joints & More | UTI — uti.edu
- Troubleshooting Adhesive Bonding Issues | 2016-09-08 | Assembly Magazine | ASSEMBLY — assemblymag.com
FAQ
What is the strongest joint design for adhesive bonding?
The double scarf lap joint is generally the strongest adhesive joint design. It combines the in-plane shear loading of a double lap joint with a tapered scarf that reduces the stress concentrations responsible for early failure, particularly under cleavage forces. According to 3M, this configuration keeps the adhesive in-plane while the scarf provides additional strength when cleavage is present.
Why is a lap joint stronger than a butt joint for glue?
A lap joint is stronger than a butt joint because it loads the adhesive primarily in shear over a larger area, while a butt joint concentrates stress at the 90° interface. Research shows maximum stress concentration is greatest at a 90° angle, making butt joints prone to early failure under tension.
Does more glue make a joint stronger?
No, more adhesive does not automatically make a joint stronger. In fact, too much glue can create a thicker bond line that often reduces strength—butt joints, for example, lose tensile strength as adhesive thickness increases. Assembly Magazine notes that most adhesives perform best with an optimal bond line thickness, and either too much or too little can cause variable results.
How does adhesive thickness affect joint strength?
Increasing adhesive thickness typically lowers joint strength, especially for butt joints in tension. For single lap joints in shear, strength remains more constant, but parametric studies still show that maximum strength increases as adhesive thickness decreases.
Can I use a butt joint for a structural repair?
You should not rely on a plain adhesive butt joint for structural repairs. The 90° interface creates high stress concentrations that can lead to premature failure, so it is unsuitable for load-bearing or safety-critical applications. For such repairs, switch to a lap or scarf joint that keeps the adhesive in shear, and always ensure the joint design matches the expected loads and conditions.
What is a scarf joint and when should I use it?
A scarf joint is a tapered joint where the adherends are cut at a shallow angle, increasing the bonded area and smoothing stress distribution. Use it when you need high strength under tension or bending, or when cleavage forces are present. The angle reduces stress concentration, but a steeper scarf angle reduces strength, so keep the taper as gradual as practical.
See also
- Surface Preparation Guide: How to Clean and Abrade for Maximum Adhesion
- Epoxy Adhesives: When and How to Use Them
- Polyurethane Adhesives: Flexible Bonding for Tough Materials
- Adhesive Selection by Material: Plastic to Metal, Fabric to Leather, and More
- Joint Design for Dissimilar Materials: Handling Thermal Expansion
Related articles
Common Surface Prep Mistakes That Ruin Adhesion: Troubleshooting Guide
Why did my glue not stick even though I did everything right?
Jul 22, 2026 · 8 min read
Clamping and Curing: Proper Pressure and Time for Different Adhesives
How much clamping pressure and time do I need for my glue to cure properly?
Jul 22, 2026 · 5 min read
Primers and Adhesion Promoters: When and How to Use Them
Do I need a primer before gluing certain materials, and what does it do? Learn when silanes, titanates, and proper prep make or break your bond.
Jul 22, 2026 · 6 min read