Adhering Stone to Concrete: Outdoor and Indoor Bonding Solutions
How to securely bond stone veneer or pavers to concrete?
On this page
Whether you're adding a stone veneer accent wall indoors or fixing loose pavers on outdoor steps, bonding stone to concrete isn't a one-size-fits-all job. The right method depends on exposure to weather, weight, and building code. Here's how to choose between mortar, construction adhesive, and epoxy for a bond that lasts.
Why Stone-to-Concrete Bonds Can Fail
For exterior stone veneer, Type S mortar is the standard because it withstands freeze-thaw cycles (Mountain View Stone); for interior applications, a flexible adhesive may suffice. But even the best material fails without understanding why. Stone is heavy, so a weak bond line can pull away under its own weight. Concrete is porous, wicking moisture that expands when frozen, exerting pressure that cracks rigid bonds. Outdoor conditions—UV, rain, temperature swings—rapidly degrade indoor adhesives.
Mortar: The Code-Approved Solution for Stone Veneer
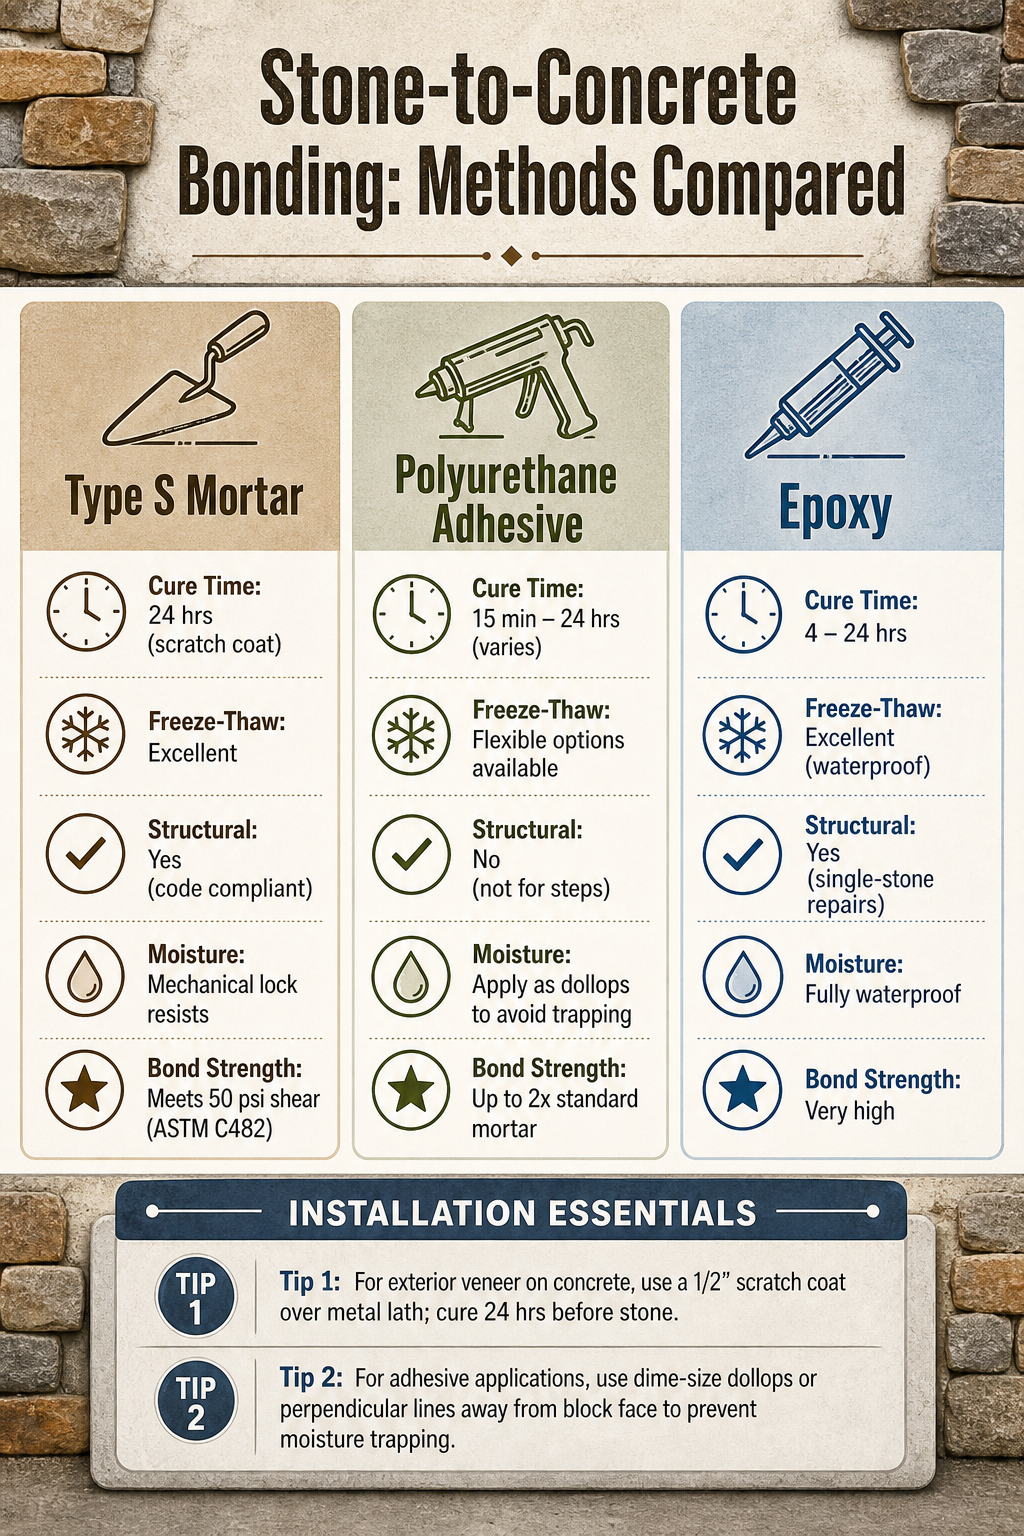
For exterior stone veneer, building code leaves no room for experimentation. The IBC and IRC, by reference to TMS 402/ACI 530/ASCE 5, require adhered veneer to develop a shear bond of at least 50 psi when tested per ASTM C482 (RMMI Installation Guide). A properly installed Type S mortar wall clears that bar reliably, while most adhesive-only systems cannot. Type S is the go-to because it’s formulated with higher compressive strength and better resistance to freeze-thaw cycling — exactly what outdoor stonework over concrete faces.
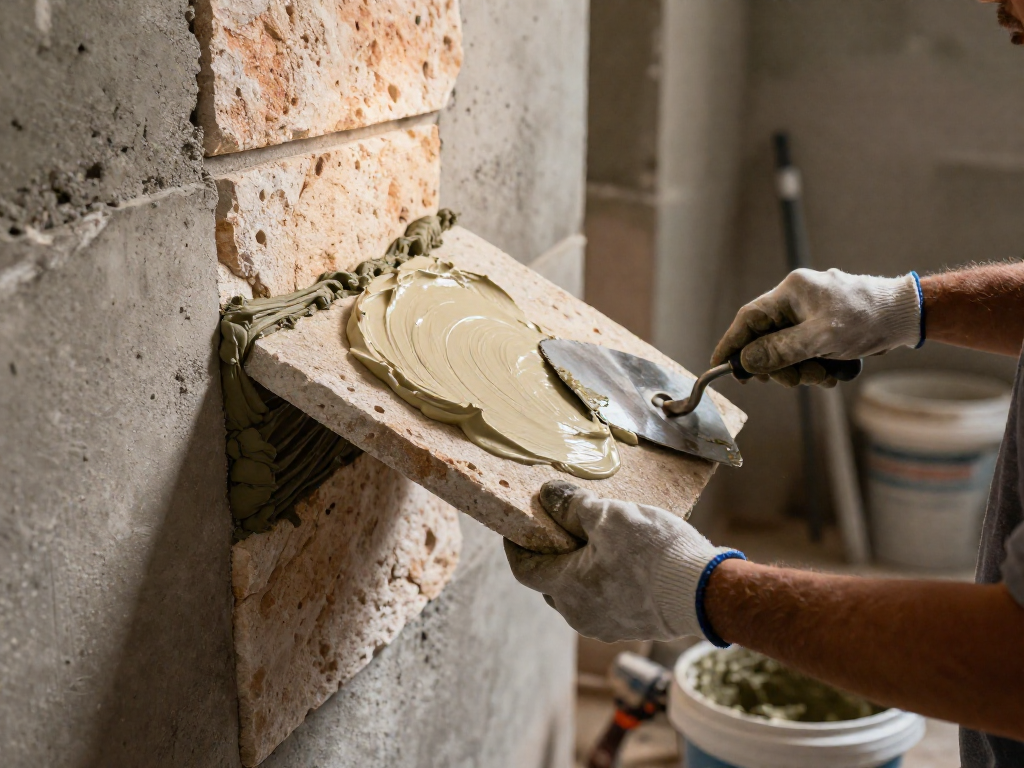
Before any stone touches the wall, the weather-resistant barrier goes up. Over the concrete backup, you need two layers of grade D building paper, like a shingled raincoat. Vertical seams get a 6-inch overlap, horizontal seams 4 inches, and the paper wraps at least 16 inches around corners. Then comes the scratch coat: a ½-inch-thick layer of Type S mortar, spread about 5 square feet at a time, and immediately scored with horizontal grooves. That scoring isn’t decorative — it creates a mechanical key for the next layer to grip. Let it cure hard for at least 24 hours.
When you’re ready to set the stone, back-butter each piece with ⅜ to ½ inch of mortar. Press it into the scratch coat until the mortar behind the stone compresses to about ¼ to ⅜ inch. That final squeezed-out thickness is what the code specifies; too little and you risk voids, too much and the weight can slump.
For a stronger bond still, polymer-modified mortars like QUIKRETE’s Veneer Stone Mortar can double the adhesion of unmodified Type S, according to manufacturer data. That extra grab makes a difference on windy elevations or near salt spray, but it doesn’t replace the layered system. If you’re skipping the scratch coat and bonding stone directly to poured concrete, the surface must be roughened to a proper Concrete Surface Profile — usually by shot blasting, bead blasting, or high-pressure water — to give the mortar something to bite into. Without that profile, even modified mortar will eventually let go.
The bottom line: mortar isn’t just one option among many; for exterior adhered stone it’s the only method that satisfies code, most manufacturer warranties, and the physics of water management.
Landscape Adhesives: Fast, Flexible, But Not for Every Job
Landscape adhesives—almost always polyurethane-based—are the weapon of choice for non-structural stone-to-concrete bonds around the yard. Think securing a loose paver cap, tacking down a decorative border stone, or fixing a single step block that’s shifted out of place. They’re fast, flexible, and forgiving on imperfect surfaces, but they are not a substitute for mortar when strength and code are on the line.
Which tube to grab depends on conditions. Surebond SB-15 sets in 15 minutes and will even bond to wet or frozen blocks, making it a lifesaver for a quick repair in cold weather. If your climate cycles through freeze-thaw, its sibling SB-20 remains pliable after cure, moving with expansion instead of cracking. For gaps and uneven surfaces, SRW SF-8 is a semi-flexible spray foam that hits full adhesion in 8 minutes while expanding to fill voids. And SuperWET adhesive foams during curing, filling gaps up to 1/4 inch—but you must allow a full 24 hours before anyone walks on it (Western Interlock).
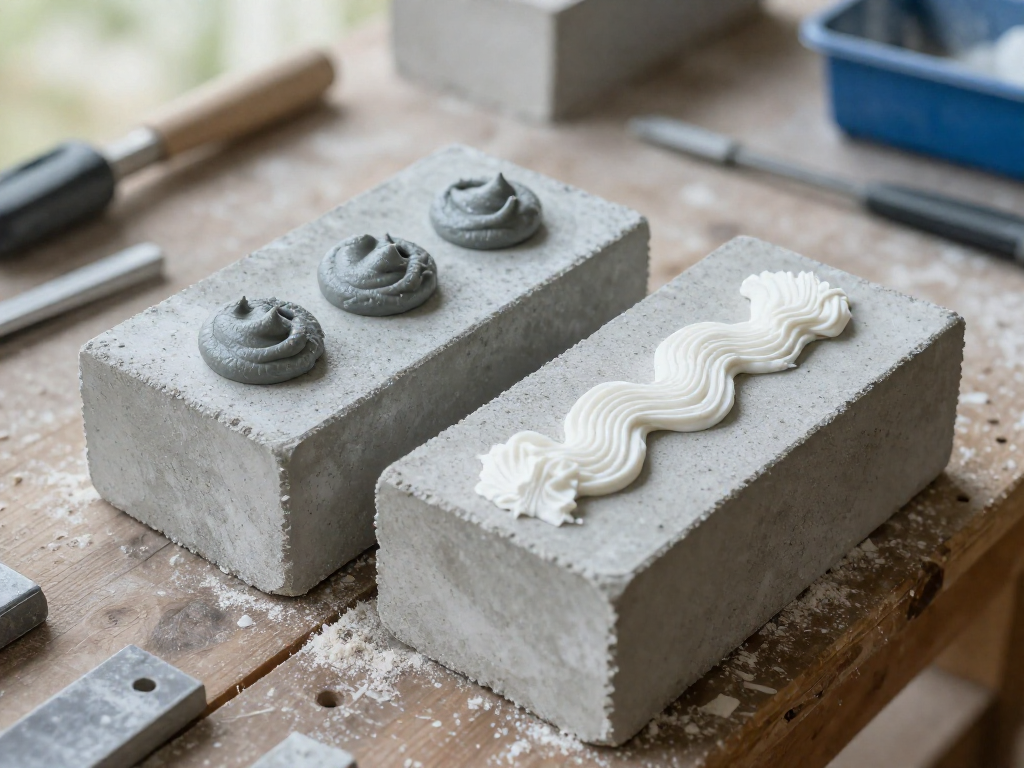
Application matters as much as formulation. Run beads in perpendicular lines or place half-inch dollops well back from the block face. Parallel lines close to the edge can trap moisture, which freezes, expands, and pushes out white lime runs. A little gap in the glue line lets water drain.
Still, know when to step away. Loctite PL500 explicitly says not for step construction, and ignoring that is a gamble. For a paver step that sees foot traffic, fast-set concrete or a masonry-grade epoxy like J-B Weld will outlast any adhesive. These landscape glues are brilliant for trim and caps—just don’t ask them to hold your weight.
When Epoxy Makes Sense: Small Repairs and Freeze-Thaw
For reattaching a single loose stone step or coping in a punishing freeze-thaw climate, epoxy is the adhesive that makes sense. A two-part epoxy like J-B Weld for Masonry cures to a rigid, high-strength bond that fills small gaps and locks the stone in place, even when mortar would crumble under repeated cycles of freezing and thawing. As one experienced contributor on the DIY Stack Exchange puts it: “Your best bet is epoxy.”
Epoxy's secret weapon is water resistance—it doesn’t soak up moisture like mortar, so ice crystal expansion can’t gradually crack the bond from within. The cured material also resists softening during the summer heat that follows a deep freeze, making it a dependable spot-fix for exterior stonework.
But epoxy isn’t a wholesale replacement for mortar. Cost climbs fast on anything larger than a couple of stones, and its brittleness means it won’t flex with concrete that shifts or expands. For full veneer walls or paving, stick with the code-approved mortar systems. Keep epoxy in your toolkit for the oddball repair—the one stone that popped loose after a rough winter, or a step tread that needs a fast, permanent hold without mixing up a whole batch of mortar.
Surface Prep: The Key to a Lasting Bond
Surface prep makes or breaks the bond. Before you mix any mortar or squeeze a tube of adhesive, the concrete must be clean, sound, and rough enough to lock on.
Start by stripping away anything that would separate the stone from the slab: dust, curing compounds, oil, efflorescence, or weak, chalky surface paste (laitance). A pressure washer with a high-volume tip handles ordinary dirt; for stubborn grime or a slick surface, acid etching with a phosphoric-acid-based cleaner—followed by a thorough rinse—opens the pores.
If you're using mortar directly on concrete, check the manufacturer's requirements. Many polymer-modified mortars now specify an ICRI Concrete Surface Profile (CSP) number, a precise roughness that gives the mortar mechanical bite. Acid etching alone rarely reaches the needed profile. Instead, you'll need shot blasting, bead blasting, or high-pressure water—a rental or pro job, but non-negotiable in freeze-thaw climates. (Old World Stone Veneer)
Concrete takes 28 days to fully cure and dry; bonding onto green concrete invites failure. The exception is a moisture-tolerant landscape adhesive formulated for damp substrates—but even then, if the slab weeps water or stays dark, wait. Finally, do a patch test: stick a small piece, let it cure completely, then try to pull it off. If the stone separates cleanly, your prep needs more work.
5 Bonding Mistakes That Lead to Failure
Most stone-on-concrete failures come down to a handful of easily avoidable missteps. First, skipping the scratch coat and waterproofing layer on exterior walls invites delamination and moisture damage—especially in freeze-thaw zones where water behind the stone expands. Second, applying adhesive in continuous beads traps water instead of letting it drain; use dime-sized dollops or perpendicular lines that leave drainage paths. Third, interior construction adhesives can’t handle outdoor freeze-thaw movement, so stick to flexible exterior formulations like Surebond SB-20. Fourth, ignoring the manufacturer’s specs: most stone veneer makers require Type S mortar, and using adhesives can void the warranty, as Mountain View Stone warns. Finally, rushing cure times—walking on glued pavers too soon or grouting before the scratch coat has fully set (about 24 hours)—ruins the bond permanently.
Sources
- [PDF] Adhered Natural Stone Veneer Installation Guide — cloud.edu
- How to Install Veneer Stone — youtube.com
- Old World Stone Veneer :: Resources | Installation Guidelines — oldworldstoneveneer.com
- masonry - What kind of adhesive should I use to secure a concrete paver stone step? - Home Improvement Stack Exchange — diy.stackexchange.com
- How to Select & Use a Landscape Adhesive for Concrete Paving Stones or Retaining Walls — youtube.com
- Landscape Block Adhesive: What It Is & How to Use It — westerninterlock.com
- Stone Veneer Installation: Mortar or Glue? - Mountain View Stone - Carved in Stone Blog — mountainviewstone.net
FAQ
Can I use landscape adhesive for stone veneer?
No, landscape adhesive is not suitable for stone veneer. Most stone veneer manufacturers specify Type S mortar as the required installation method; using adhesives can void warranties and lead to failure. Landscape adhesives are designed for blocks and pavers, not the structural and environmental demands of adhered stone veneer.
How do I bond stone to concrete outdoors in a freeze-thaw climate?
For stone veneer, use a polymer-modified mortar like QUIKRETE Polymer-Modified Veneer Stone Mortar, which provides twice the bond strength of standard mortar and resists freeze-thaw cycles. For non-veneer applications (e.g., stone steps), a flexible landscape adhesive such as Surebond SB-20 or an epoxy like J-B Weld for masonry can work. Ensure the concrete has the proper surface roughness, typically achieved by blasting, or apply a scratch coat for veneer installations.
Do I need a scratch coat before applying mortar?
It depends on the substrate. For stone veneer over lath or framed walls, a scratch coat is typically required and must cure for a minimum of 24 hours before stone installation. When bonding directly to poured concrete, you can skip the scratch coat if the concrete is prepared to the required surface profile, such as by shot, bead, or high-pressure water blasting.
What’s the difference between Type S and polymer-modified mortar?
Type S is a standard mortar specified for its durability in freeze-thaw climates, while polymer-modified mortar contains resin additives that increase bond strength and water resistance. For example, QUIKRETE Polymer-Modified Veneer Stone Mortar offers twice the bond strength of standard mortar, making it especially suited for demanding exterior applications.
Can I apply adhesive to wet concrete?
Some landscape adhesives, like Surebond SB-15, are formulated to bond to wet or even frozen concrete and set in 15 minutes. However, for stone veneer mortar, the concrete should be clean and surface-damp but without standing water; check the mortar manufacturer’s instructions to confirm suitability.
How long should mortar cure before sealing?
Allow the mortar to set hard, usually about 24 hours, before applying sealer. For full cure and maximum bond strength, refer to the sealer manufacturer’s recommendations, as some may require a longer wait.
See also
- Bonding Metal to Concrete: A Complete Guide
- How to Attach Stone to Drywall
- Choosing the Right Exterior Construction Adhesive
Related articles
Attaching Foam to Wood: Craft vs Structural Applications
How do I glue foam to wood without melting or weakening the foam?
Jul 22, 2026 · 6 min read
Joining Concrete to Wood: The Right Adhesive for Fence Posts and Decks
Which adhesive is best for attaching wood to concrete in outdoor projects?
Jul 22, 2026 · 11 min read
How to Bond Acrylic to Metal: Achieving a Clear, Strong Joint
What's the best adhesive for bonding acrylic (plexiglass) to metal without clouding?
Jul 22, 2026 · 6 min read